Friday 18 January 2019

ARDUINO AS TRAFFIC SIGNAL LIGHT

IN THIS POST HOW TO CREATE A TRAFFIC SIGNAL LIGHT USING ARDUINO MICROCONTROLLER

NEEDS


RED LED 1N
GREEN LED 1N
YELLOW LED 1N
ARDUINO /UNO/NANO/PRO MINI ANY TYPE

TIME DELAY FOR SEQUANCE

FOR 1 MINUTE
                          60SEC*1000=60000= 1MINUTE
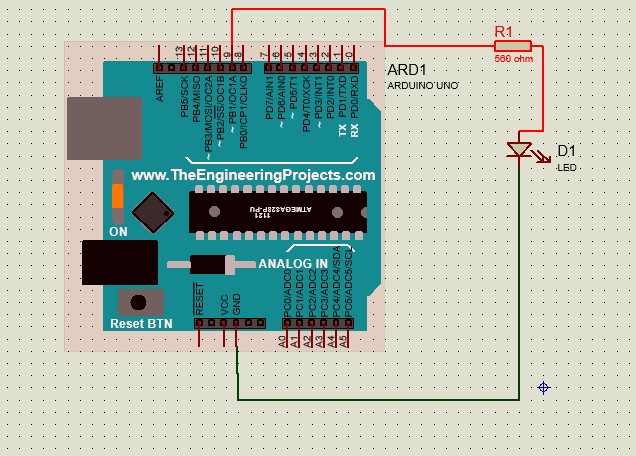

CIRCUIT DIAGRAM


CODE


// the setup function runs once when you press reset or power the board
void setup() {
  // initialize digital pin LED_BUILTIN as an output.
 
  pinMode(3, OUTPUT);
  pinMode(4, OUTPUT);
}

// the loop function runs over and over again forever
void loop() {
 

  digitalWrite(3, HIGH);   // turn the LED on (HIGH is the voltage level)
  delay(50000);
  ;                      // wait for a second
  digitalWrite(3, LOW);    // turn the LED off by making the voltage LOW
  delay(1);

  digitalWrite(4, HIGH);   // turn the LED on (HIGH is the voltage level)
  delay(60000);
  ;                      // wait for a second
  digitalWrite(4, LOW);    // turn the LED off by making the voltage LOW
  delay(1);
}

Tuesday 15 January 2019

ULTRASONIC SENSOR AS DISTANCE MEASURE

n this Arduino Tutorial we will learn how the HC-SR04 Ultrasonic Sensor works and how to use it with the Arduino Board. You can watch the following video or read the written tutorial below.

How It Works – Ultrasonic Sensor


It emits an ultrasound at 40 000 Hz which travels through the air and if there is an object or obstacle on its path It will bounce back to the module. Considering the travel time and the speed of the sound you can calculate the distance.
Ultrasonic-Sensor How it Works
The HC-SR04 Ultrasonic Module has 4 pins, Ground, VCC, Trig and Echo. The Ground and the VCC pins of the module needs to be connected to the Ground and the 5 volts pins on the Arduino Board respectively and the trig and echo pins to any Digital I/O pin on the Arduino Board.
In order to generate the ultrasound you need to set the Trig on a High State for 10 µs. That will send out an 8 cycle sonic burst which will travel at the speed sound and it will be received in the Echo pin. The Echo pin will output the time in microseconds the sound wave traveled.
Ultrasonic Sensor Diagram
For example, if the object is 10 cm away from the sensor, and the speed of the sound is 340 m/s or 0.034 cm/µs the sound wave will need to travel about 294 u seconds. But what you will get from the Echo pin will be double that number because the sound wave needs to travel forward and bounce backward.  So in order to get the distance in cm we need to multiply the received travel time value from the echo pin by 0.034 and divide it by 2.
Ultrasonic-Sensor-Equasions


CODE 

A/*
* Ultrasonic Sensor HC-SR04 and Arduino Tutorial
*
* by Dejan Nedelkovski,
* www.HowToMechatronics.com
*
*/

#include <LiquidCrystal.h> // includes the LiquidCrystal Library

LiquidCrystal lcd(1, 2, 4, 5, 6, 7); // Creates an LCD object. Parameters: (rs, enable, d4, d5, d6, d7)

const int trigPin = 9;
const int echoPin = 10;

long duration;
int distanceCm, distanceInch;

void setup() {
lcd.begin(16,2); // Initializes the interface to the LCD screen, and specifies the dimensions (width and height) of the display

pinMode(trigPin, OUTPUT);
pinMode(echoPin, INPUT);
}

void loop() {
digitalWrite(trigPin, LOW);
delayMicroseconds(2);

digitalWrite(trigPin, HIGH);
delayMicroseconds(10);
digitalWrite(trigPin, LOW);

duration = pulseIn(echoPin, HIGH);
distanceCm= duration*0.034/2;
distanceInch = duration*0.0133/2;

lcd.setCursor(0,0); // Sets the location at which subsequent text written to the LCD will be displayed
lcd.print("Distance: "); // Prints string "Distance" on the LCD
lcd.print(distanceCm); // Prints the distance value from the sensor
lcd.print(" cm");
delay(10);
lcd.setCursor(0,1);
lcd.print("Distance: ");
lcd.print(distanceInch);
lcd.print(" inch");
delay(10);
}


LED FADE USING ARDUINO


CODE


/*
  Fade

  This example shows how to fade an LED on pin 9 using the analogWrite()
  function.

  The analogWrite() function uses PWM, so if you want to change the pin you're
  using, be sure to use another PWM capable pin. On most Arduino, the PWM pins
  are identified with a "~" sign, like ~3, ~5, ~6, ~9, ~10 and ~11.

  This example code is in the public domain.

  http://www.arduino.cc/en/Tutorial/Fade
*/

int led = 9;           // the PWM pin the LED is attached to
int brightness = 0;    // how bright the LED is
int fadeAmount = 5;    // how many points to fade the LED by

// the setup routine runs once when you press reset:
void setup() {
  // declare pin 9 to be an output:
  pinMode(led, OUTPUT);
}

// the loop routine runs over and over again forever:
void loop() {
  // set the brightness of pin 9:
  analogWrite(led, brightness);

  // change the brightness for next time through the loop:
  brightness = brightness + fadeAmount;

  // reverse the direction of the fading at the ends of the fade:
  if (brightness <= 0 || brightness >= 255) {
    fadeAmount = -fadeAmount;
  }
  // wait for 30 milliseconds to see the dimming effect
  delay(30);
}

LED BLINK WITH ARDUINO


CODE


  Blink

  Turns an LED on for one second, then off for one second, repeatedly.

  Most Arduinos have an on-board LED you can control. On the UNO, MEGA and ZERO
  it is attached to digital pin 13, on MKR1000 on pin 6. LED_BUILTIN is set to
  the correct LED pin independent of which board is used.
  If you want to know what pin the on-board LED is connected to on your Arduino
  model, check the Technical Specs of your board at:
  https://www.arduino.cc/en/Main/Products

  modified 8 May 2014
  by Scott Fitzgerald
  modified 2 Sep 2016
  by Arturo Guadalupi
  modified 8 Sep 2018
  by Abhijith

  This example code is in the public domain.

  http://www.arduino.cc/en/Tutorial/Blink
*/

// the setup function runs once when you press reset or power the board
void setup() {
  // initialize digital pin PWM 09 as an output.
  pinMode(9, OUTPUT);
}

// the loop function runs over and over again forever
void loop() {
  digitalWrite(9, HIGH);   // turn the LED on (HIGH is the voltage level)
  delay(1000);                       // wait for a second
  digitalWrite(9, LOW);    // turn the LED off by making the voltage LOW
  delay(1000);                       // wait for a second
}